Deploy as Chatbot
When to Use Chatbot Deployment in SmythOS?
A SmythOS chatbot is simply your existing agent wrapped in a web UI. Once live, use it to:
- Answer questions using your Studio workflows
- Receive files when Allow Attachments is enabled
- Match your brand with custom colors, icon, and intro message
Step 1: Configure Your Domain
You can test the chatbot on a default subdomain or verify a custom one for production.
| Option | When to use | Steps |
|---|---|---|
| Default subdomain | You just want to test quickly | Nothing to do; SmythOS assigns one automatically |
| Custom subdomain | You need a branded or production URL | Go to Subdomains, add the host, then click Verify to complete DNS validation |
Step 2: Enable the Chatbot Deployment
This makes the chatbot available for public use. Once toggled on, the UI settings become configurable.
- Open your Agent → Settings → Deployments
- Toggle Chatbot ON
- Click Configuration to open the settings modal
Step 3: Customize the Chatbot Configuration
This is where you define how your chatbot looks and behaves, including messages, brand styling, file uploads, and access control.
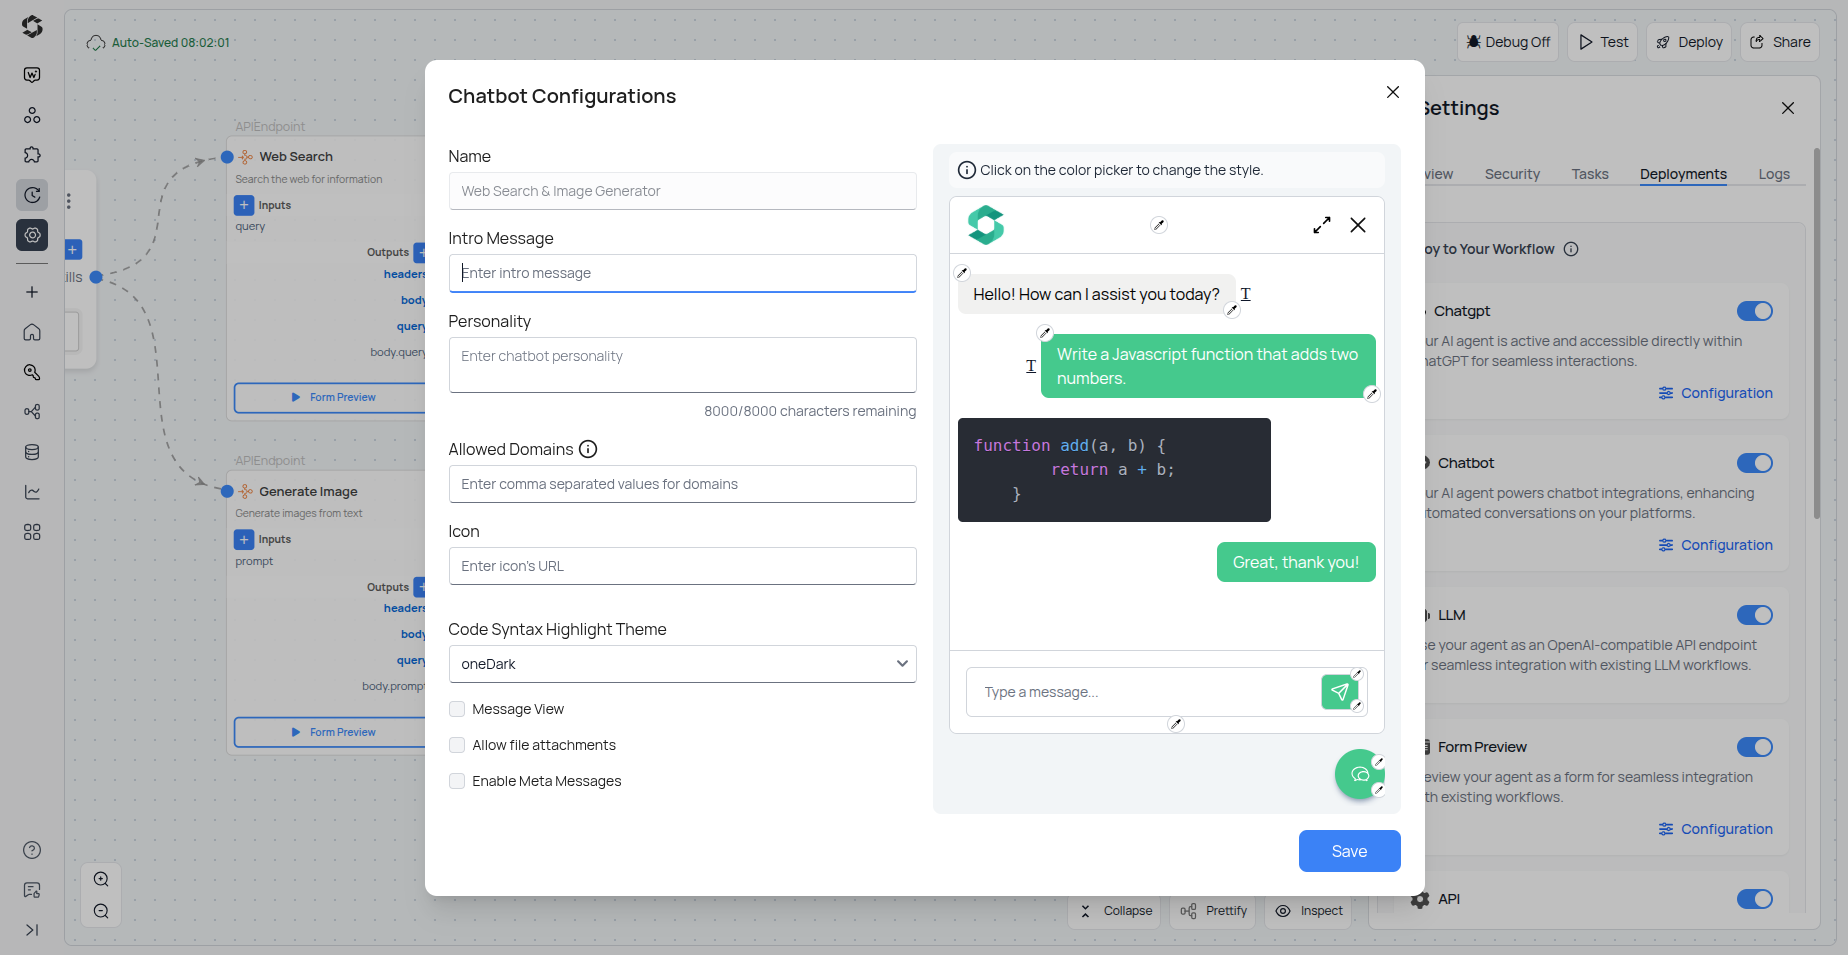
Customize chatbot behavior, intro message, personality, and more
| Field | Description | Tip |
|---|---|---|
| Name | Internal label for this chatbot deployment | Helps you identify multiple bots |
| Intro Message | First line visitors see when chat opens | Keep it friendly and concise |
| Personality | System prompt that guides tone and style; specify tone, behavior, or any contextual instructions. | e.g., "You are a witty but helpful AI" |
| Allowed Domains | Comma‑separated list where the bot is allowed to run to limit deployment to authorized websites. | Leave blank for no restriction |
| Icon | URL for the launcher avatar (PNG/SVG) | Square images render best |
| Code Syntax Highlight Theme | Theme for code blocks (e.g., oneDark, dracula) | Preview updates live in the right‑hand pane |
| Message View | Embed chat inside a page element instead of floating bubble | Check the box to enable embed mode |
| Allow File Attachments | Let users upload files during chat | Ideal for PDF or CSV analysis workflows |
| Enable Meta Messages | Display real-time skill execution information (skill name, input parameters, and output results) in the chatbot during agent skill calls | Helpful for transparency and debugging; only visible when deployed on external websites |
Step 4: Customize Look and Feel of Chatbot
| Customise | How |
|---|---|
| Colors & fonts | Use the color‑picker in the config modal |
| Bubble CSS | Pass humanBubbleClass / botBubbleClass in ChatBot.init() |
| Icon | Paste an image URL (PNG / SVG) |
JavaScript Example
ChatBot.init({
  name: 'My Agent 101',
  introMessage: 'Happy to see you, how can I be of assistance today?',
  // humanBubbleClass: 'human-chatbox-bubble',
  // botBubbleClass: 'bot-chatbox-bubble',
  domain: 'your-agent.agent.pstage.smyth.ai',
  isChatOnly: false, // false = floating bubble, true = inline embed
  allowAttachments: true
});
Custom CSS (Optional)
You can override bubble styles using your custom classes.
.human-chatbox-bubble {
  font-size: 24px !important;
}

.bot-chatbox-bubble {
  font-size: 30px !important;
}

/* Override elements inside bot bubbles */
.bot-chatbox-bubble h1 {
  color: #000000;
}
Step 5: Embed the Chatbot
SmythOS supports two deployment modes. Pick one based on how you want the chatbot to appear on your site.
Inline Chat Default
Inline mode renders the chatbot inside a specific container. Use this when embedding inside a sidebar, help desk page, or layout grid.
<div id="smythos-chatbot-container"></div>
<!-- Place this div wherever you want the chat window to appear -->
Then add the script at the end of your page:
<script src="https://your-agent.agent.pstage.smyth.ai/static/embodiment/chatBot/chatbot-v2.js"></script>
<script>
  // Same init call for both modes; only the value of `isChatOnly` changes.
  ChatBot.init({
    domain: 'your-agent.agent.pstage.smyth.ai',
     isChatOnly: false, // false = floating bubble, true = inline embed
    // attachments are not allowed by default; they can be enabled by checking the box in the configurations to allow them
    allowAttachments: false,
    // ... additional settings go here ...
    // if you set your intro message, then it would go here as shown in line below:
    introMessage: 'This is the intro message for your chatbot',
    // ... color settings here...
  });
</script>
Floating Bubble Popup
Adds a launcher in the bottom‑right corner, similar to a live‑chat widget.
<script src="https://your-agent.agent.pstage.smyth.ai/static/embodiment/chatBot/chatbot-v2.js"></script>
<script>
  ChatBot.init({
    domain: 'your-agent.agent.pstage.smyth.ai',
    isChatOnly: false, // false = floating bubble, true = inline embed
    // attachments are not allowed by default; they can be enabled by checking the box in the configurations to allow them
    allowAttachments: false,
    // ... additional settings go here ...
    // if you set your intro message, then it would go here as shown in line below:
    introMessage: 'This is the intro message for your chatbot',
    // ... color settings here...
  });
</script>
Step 6: Deploy and Test
- Make sure you’ve deployed at least one version of your Agent
- Load the page where the script is embedded
- Send a test message and confirm the Agent responds correctly
What's Next?
Troubleshooting
| Symptom | Fix |
|---|---|
| Nothing shows on site | Ensure ChatBot.init() is called after the DOM loads |
| 404 on script | Double-check your agent domain and subdomain |
| Unauthorized error | Make sure your site is listed under Allowed Domains |
| Agent not responding | Confirm the agent has a deployed version and live workflows |
| File upload not working | Enable Allow File Attachments in chatbot configuration |