Data Spaces
Data Spaces are named containers in the Data Pool that hold files or raw text. These sources are indexed using vector embeddings so your agents can retrieve and use them through retrieval-augmented generation (RAG). Each Data Space is backed by a vector database provider of your choice: SmythOS managed Pinecone, your own Pinecone instance, or Milvus.
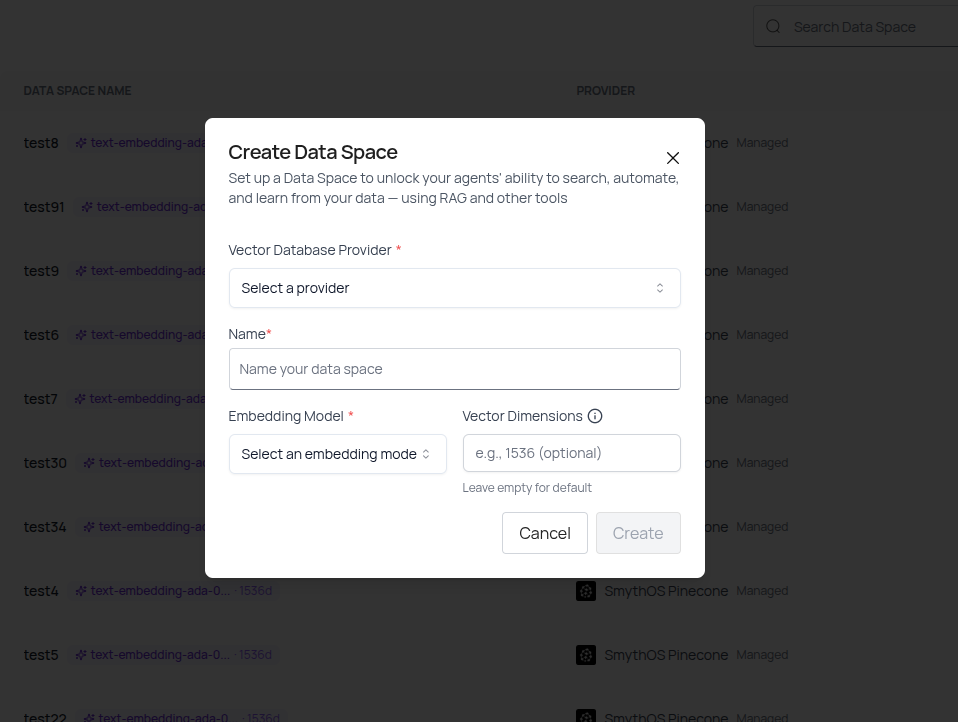
How to Create a Data Space
- Open the Data Pool from the left navigation
- Click Add Data Space
- Fill in the required fields:
- Vector Database Provider – Choose SmythOS Pinecone, your own Pinecone, or Milvus
- Name – Enter a descriptive name for your space
- Embedding Model – Select your preferred embedding model
- Vector Dimensions – Specify the vector dimensions for your embeddings
- Click Create
Each Data Space represents a dedicated container with its own vector database provider.
Setting Up Vector Database Providers
SmythOS Managed Pinecone (Default)
No additional setup required. Start indexing immediately with our managed infrastructure.
Your Own Pinecone or Milvus
To use a custom provider, you'll need to create a provider connection first:
- When creating a Data Space, click Vector Database Provider dropdown
- Click Create New Connection
- Select your provider type: Pinecone or Milvus
- Enter your provider credentials:
Pinecone Connection
- Connection Name – A label for this connection (e.g., "Production Pinecone")
- API Key – Your Pinecone API key
- Index Name – The name of your Pinecone index
Milvus Connection
- Connection Name – A label for this connection (e.g., "Self-Hosted Milvus")
- Address – The address/endpoint of your Milvus server
- Token – Your Milvus authentication token
- Click Create Connection
- The connection is now available in your provider dropdown
Managing Data Sources
Adding a Data Source
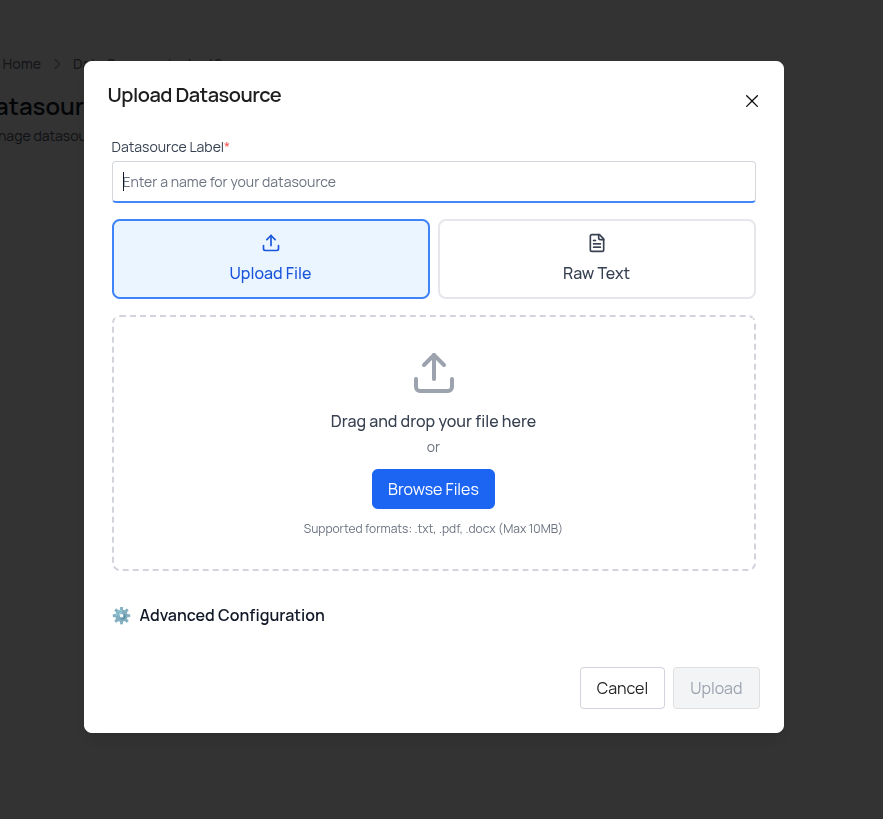
- From the Data Pool, click Add Data Source in the Actions column for your Data Space
- The Upload Datasource modal opens
- Enter a Datasource Label for reference
- Choose your upload method:
- Upload File – Select
.txt,.pdf, or.docxfiles (max 10MB) - Raw Text – Paste text content directly
- Upload File – Select
- (Optional) Expand Advanced Configuration to customize:
- Chunk Size – How many characters per chunk (default: 1000)
- Chunk Overlap – Overlap between chunks for context (default: 200)
- Custom Metadata – Add JSON metadata to enrich the source (e.g., author, date, tags)
- Click Upload to add the source
Files and text are transformed into searchable vector embeddings with customizable chunking.

Fine-tune how your data is chunked and add custom metadata.
Viewing Data Source Details
- Navigate to a Data Space
- View the Datasources table showing:
- Name – The datasource label
- Size – File/content size
- Created – Timestamp of creation
- Actions – View details or delete
- Click the View Details icon to see:
- Number of vectors created
- Total size
- Creation timestamp
- Chunking configuration (chunk size and overlap)
- Metadata fields (title, author, date, tags)
- Preview of the source content
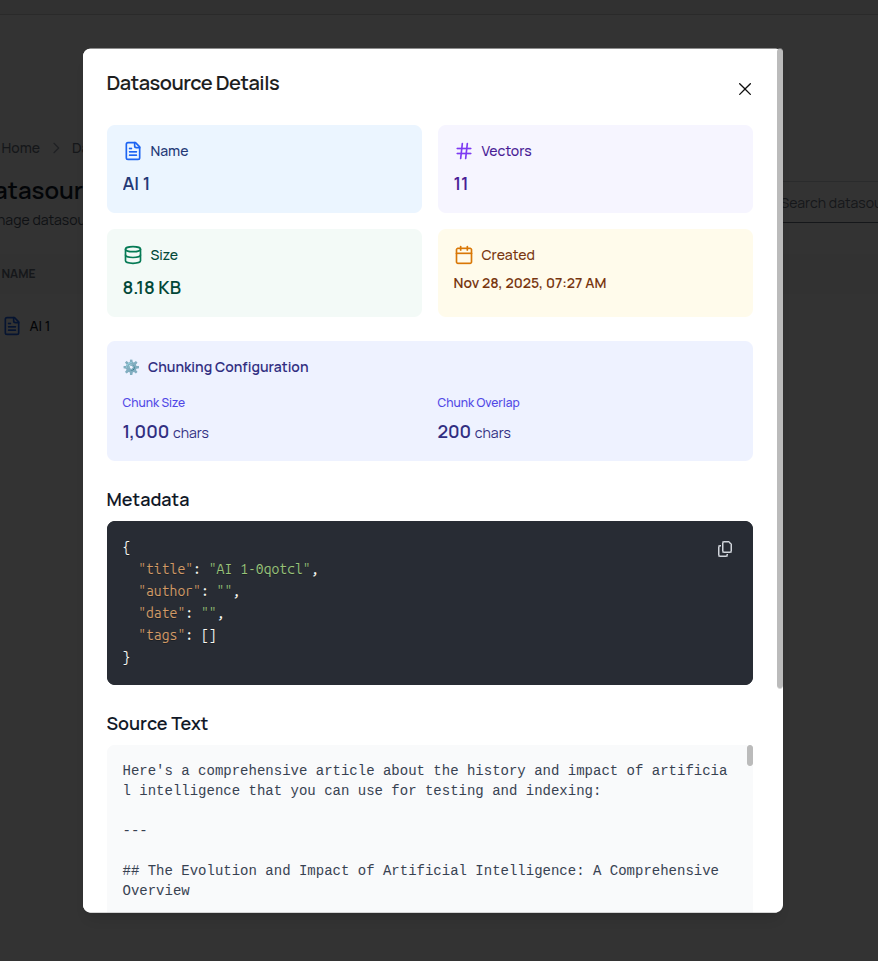
Review configuration and content of any indexed source.
Deleting a Data Source
- Click the Delete icon in the Actions column for a datasource
- Confirm the deletion
- The source is immediately removed from your Data Space
How Indexing Works
Indexing starts automatically once a source is added. The embedding process:
- Chunking – Your content is split into chunks based on your configured chunk size and overlap
- Embedding – Each chunk is converted to vector embeddings using your selected embedding model
- Storage – Embeddings are stored in your vector database provider (SmythOS Pinecone, your Pinecone, or Milvus)
- Availability – Once indexed, agents can immediately retrieve and use the content
Manage and Organize Spaces
From the Data Pool overview:
- View all spaces – See your Data Spaces in a table with provider and embedding model information
- Add sources – Click Add Data Source to upload files or paste text
- View datasources – Click on a Data Space row to enter the datasources view
- Delete a space – Click the Delete icon to remove an entire Data Space
Use Data Spaces in Agents
To connect a Data Space to an agent:
- Open your Project Space
- Select or create an agent
- Attach one or more Data Spaces with the RAG components
Once connected, the agent uses semantic retrieval to reference indexed content during execution.
Understanding Chunking and Metadata
Chunking Configuration
Chunk Size controls how your content is split:
- Smaller chunks (e.g., 500) – More granular retrieval, faster processing, higher token usage
- Larger chunks (e.g., 2000) – More context per chunk, better for complex documents, fewer API calls
Chunk Overlap ensures continuity between chunks:
- Prevents loss of context at chunk boundaries
- Default of 200 characters is suitable for most use cases
- Increase for highly technical or dense content
Custom Metadata
Add structured metadata as JSON to enrich your datasources:
{
  "title": "Q3 Financial Report",
  "author": "Finance Team",
  "date": "2024-09-30",
  "tags": ["finance", "quarterly", "2024"]
}
Metadata helps with:
- Organizing sources for better retrieval
- Filtering and categorization
- Adding context to agent responses
FAQ
What file types are supported?
You can upload .txt, .pdf, and .docx files, or paste raw text content directly.
What is the maximum file size?
The maximum file size is 10MB per datasource.
Can a single space contain both files and raw text?
Yes. Data Spaces can include multiple file types and raw text sources mixed together.
Is there a limit to how many sources I can add?
There is no enforced limit. For better performance and organisation, group similar content across separate spaces.
Can I use different vector database providers for different Data Spaces?
Yes. Each Data Space can use a different provider. For example, use SmythOS Pinecone for testing and your own Pinecone for production.
What happens if I modify chunking settings?
Chunking settings apply to new uploads. Existing sources keep their original chunking configuration. To re-chunk existing data, delete and re-upload the source.
What if indexing fails?
Common causes include:
- File type not supported (use
.txt,.pdf, or.docx) - File size exceeds 10MB
- Vector dimension mismatch with your database
Check these factors and retry. For additional support, review your Custom Storage configuration.