Building a smart AI agent is only part of the job. The real power comes when that agent can reach outside itself to fetch information, run services, or pull context from your business tools.
Modern AI agents need context. They must combine knowledge from LLMs with external data sources, business logic, or specialized computation engines. Without a standard protocol, every new integration becomes a custom project. You learn a new API style, write and maintain adapter code, and battle version drift when tools change
That’s where the MCP Client comes in.
The MCP Client is a component in SmythOS that lets your agent connect to external tools using a standard called the Model Context Protocol (MCP). It works in real time, is easy to set up, and doesn’t require custom code for every new service.
This article will show you how to use the MCP Client, why it matters, and how to build workflows that save time and scale easily.
What Is MCP and Why Does It Matter?
When you’re building AI agents, connecting them to the outside world is often the hard part. Most APIs expect a fixed input and return a fixed response. But real conversations are open, flowing, and unpredictable.
The Model Context Protocol (MCP) is designed with that in mind. It lets agents send prompts to services and receive live responses as they stream back. Under the hood, it uses Server-Sent Events (SSE) to make this possible.
What that means for you: fewer blockers, less boilerplate, and a more natural way for your AI to get things done using real-time tools.
Why Understanding MCP Matters
At its core, MCP is a protocol for streaming context between an AI agent and external services. It’s designed to make agents more capable by letting them ask questions, run commands, or retrieve data from tools they weren’t originally trained on.
Let’s use an everyday analogy:
Imagine your agent is like a traveler visiting a new country. Without MCP, every time it visits a different country (or service), it has to learn the local language from scratch. With MCP, every service agrees to speak the same global language. Your agent can now travel anywhere and be instantly understood.<
What the MCP Client Actually Does
The MCP Client is a simple way to connect your AI agent to external services. You don’t need to build new glue code every time. You don’t need to set up a middleware server. You don’t even need to match formats or versions.
Instead, you describe the task in a natural prompt, point the agent to the service you want to use, and the MCP Client takes care of the communication.
- No adapters to write
- No extra deployment
- No patching mismatched payloads
It just works, and it stays out of your way.
Setting Up the MCP Client
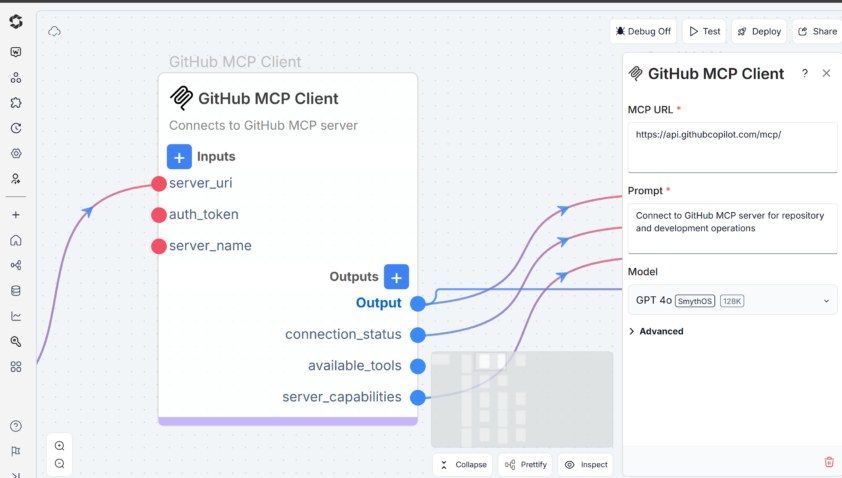
Step 1: Define the Connection
You’ll start by describing the connection between your agent and the service.
| Setting | Description |
|---|---|
| MCP URL | The address of the tool or service. It must support SSE. |
| Prompt | A natural-language instruction. For example: “Summarize this support ticket.” |
| Model | The language model your agent uses. This guides how the prompt is interpreted. |
| System Prompt (Optional) | A shared rule, like “Reply using valid JSON.” |
Step 2: Pass Inputs
To make your connection flexible, you can inject different types of inputs into your prompt:
- Prompt input: A placeholder that gets replaced automatically (e.g.
{{prompt}}) - Custom inputs: You can add things like
{{file_id}}or{{user_query}}to personalize each request
Step 3: Handle Outputs
When the service responds, the MCP Client receives the stream. You decide what to extract:
- Raw output: The full response as-is
- Custom outputs: Extract key fields like
summary,sentiment, orstatus
A Real Example: Summarizing Support Tickets
Here’s what it looks like in practice:
- Your support team uploads a PDF with a customer issue
- Your agent sends that file and a prompt to the MCP Client
- The connected summarizer service responds with structured JSON
- Your agent extracts the key points and drafts a reply
You don’t write any new code. You don’t build a new workflow. You just connect to one endpoint, and it all fits together.
When the MCP Client Makes Sense
Use it when:
- You want your AI agent to call a tool or service using natural prompts
- The tool supports streaming responses via SSE
- You’re exposing internal tools, but don’t want to maintain a REST API
If you need file uploads, binary data, or interactive back-and-forth, another SmythOS component may be better suited.
Tips That Save Time
- Use system prompts to enforce formatting (like valid JSON)
- Start simple and use basic prompts and test them well before scaling up
- Add custom outputs early to avoid manual parsing later
- Double-check your MCP server URL before connecting it to production
How to Know It’s Working
Once your agent is using MCP to connect with external services, you’ll want to know if it’s actually improving the user experience. Are the responses better? Are people finding what they need faster?
You can use familiar tools to check:
- Google Search Console shows how users are discovering your content. If your agent is surfacing better answers or enabling smarter responses through MCP, you may notice improvements in impressions and click-through rates.
- Google Analytics 4 helps you monitor how people interact with your content. If users are spending more time on the page or bouncing less often, it can be a sign that the agent is doing its job well.
- User actions like downloads, file opens, or completed tasks can indicate whether the MCP-enhanced agent is actually helping people get things done.
MCP gives your agent access to richer, real-time context. These tools help you see if that context is making a meaningful difference. It’s how you turn better integrations into better outcomes.
Final Thoughts
When done well, integration should feel invisible. The MCP Client helps you get there. It does the work quietly, giving your agent access to what it needs, not demanding your attention.
If you’re building AI agents in SmythOS and you want them to reach out and do useful work without writing connectors from scratch, then this is a reliable and lightweight way to get there.
It’s not flashy, but it’s essential. And once you use it, you’ll wonder why connecting external tools ever felt complicated in the first place.
Start small. Connect to one tool. Build a smooth path. Then scale it up, knowing you’ve already removed the hardest parts.
If you made it this far, thanks for reading. Hopefully, this gave you something useful to work with.